Tag Archive: Virtualization


This article is not really written with knowledge usable for a production network in mind. It’s more of an “I have not failed. I’ve just found 10,000 ways that won’t work.” kind of article.

I’m currently in a mailing group with fellow network engineers who are setting up GRE tunnels to each others home networks over the public internet. Over those networks we speak (external) BGP towards each other and each engineer announces his own private address range. With around 10 engineers so far and a partial mesh of tunnels, it gives a useful topology to troubleshoot and experiment with. Just like the real internet, you don’t know what happens day-to-day, neighborships may go down or suddenly new ones are added, and other next-hops may become more interesting for some routes suddenly.

SwitchRouting1

But of course it requires a device at home capable of both GRE and BGP. A Cisco router will do, as will Linux with Quagga and many other industrial routers. But the only device I currently have running 24/7 is my WS-C3560-8PC switch. Although it has an IP Services IOS, is already routing and can do GRE and BGP, it doesn’t do NAT. Easy enough: allow GRE through on the router that does the NAT in the home network. Turns out the old DD-WRT version I have on my current router doesn’t support it. Sure I can replace it but it would cost me a new router and it would not be a challenge.

SwitchRouting2

Solution: give the switch a direct public IP address and do the tunnels from there. After all, the internal IP addresses are encapsulated in GRE for transport so NAT is required for them. Since the switch already has a default route towards the router, set up host routes (a /32) per remote GRE endpoint. However, this still introduces asymmetric routing: the provider subnet is a connected subnet for the switch, so incoming traffic will go through the router and outgoing directly from the switch to the internet without NAT. Of course that will not work.

SwitchRouting3

So yet another problem to work around. This can be solved for a large part using Policy-Based Routing (PBR): on the client VLAN interface, redirect all traffic not meant for a private range towards the router. But again, this has complications: the routing table does not reflect the actual routing being done, more administrative overhead, and all packets originated from the local switch will still follow the default (the 3560 switch does not support PBR for locally generated packets).

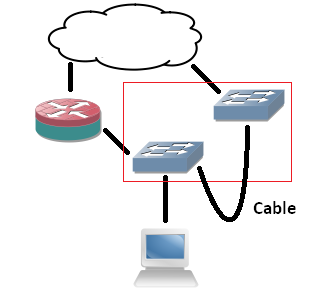
Next idea: it would be nice to have an extra device that can do GRE and BGP directly towards the internet and my switch can route private range packets towards it. But the constraint is no new device. So that brings me to VRFs: split the current 3560 switch in two: one routing table for the internal routing (vrf MAIN), one for the GRE tunnels (vrf BGP). However, to connect the two VRFs on the same physical device I would need to loop a cable from one switchport to another, and I only have 8 ports. The rest would work out fine: point private ranges from a VLAN interface in one VRF to a next-hop VLAN interface over that cable in another VRF. That second VRF can have a default route towards the internet and set up GRE tunnels. The two VRFs would share one subnet.

SwitchRouting4

Since I don’t want to deal with that extra cable, would it be possible to route between VRFs internally? I’ve tried similar actions before, but those required a route-map and a physical incoming interface. I might as well use PBR if I go that way. Internal interfaces for routing between VRFs exist on ASR series, but not my simple 8-port 3560. But what if I replace the cable with tunnel interfaces? Is it possible to put both endpoints in different VRFs? Yes, the 15.0(2) IOS supports it!

SwitchRouting5

The tunnel interfaces have two commands that are useful for this:

  • vrf definition : just like on any other layer 3 interface, it specifies the routing table of the packets in the interface (in the tunnel).
  • tunnel vrf :  specifies the underlying VRF from which the packets will be sent, after GRE encapsulation.

With these two commands, it’s possible to have tunnels in one VRF transporting packets for another VRF. The concept is vaguely similar to MPLS-VPN,  where your intermediate (provider) routers only have one routing table which is used to transport packets towards routers that have the VRF-awareness (provider-edge).

interface Vlan2
ip address 192.168.2.1 255.255.255.0
interface Vlan3
ip address 192.168.3.1 255.255.255.0
interface Tunnel75
vrf forwarding MAIN
ip address 192.168.7.5 255.255.255.252
tunnel source Vlan2
tunnel destination 192.168.3.1
interface Tunnel76
vrf forwarding BGP
ip address 192.168.7.6 255.255.255.252
tunnel source Vlan3
tunnel destination 192.168.2.1

So I configure two tunnel interfaces, both in the main routing table. Source and destination are two IP addresses locally configured on the router.  I chose VLAN interface, loopbacks will likely work as well. Inside the tunnels, one is set to the first VRF, the other to the second. One of the VRFs may be shared with the main (outside tunnels) routing table, but it’s not a requirement. Configure both tunnel interfaces as two sides of a point-to-point connection and they come up. Ping works, and even MTU 1500 works over the tunnels, despite the show interface command showing an MTU of only 1476!

Next, I set up BGP to be VRF-aware. Logically, there are two ‘routers’, one of which is the endpoint for the GRE tunnels, and another one which connects to it behind it for internal routing. Normally if it were two physical routers, I would set up internal BGP between them since I’m already using that protocol. But there’s no difference here: you can make the VRFs speak BGP to each other using one single configuration.

router bgp 65000
address-family ipv4 vrf MAIN
neighbor 192.168.7.6 remote-as 65000
network 192.168.0.0 mask 255.255.248.0
neighbor 192.168.7.6 activate
exit-address-family
address-family ipv4 vrf BGP
bgp router-id 192.168.7.6
neighbor 192.168.7.5 remote-as 65000
neighbor 192.168.7.5 activate
exit-address-family

A few points did surface: you need to specify the neighbors (the IP addresses of the local device in the different VRFs) under the correct address families. You also need to specify a route distinguisher under the VRF as it is required for VRF-aware BGP. And maybe the most ironic: you need a bgp router-id set inside the VRF address-family so it differs from the other VRF (the highest interface IP address by default), otherwise the two ‘BGP peers’ will notice the duplicate router-id and it will not work. But after all of that, BGP comes up and routes are exchanged between the two VRFs! For the GRE tunnels towards the internet, the tunnel vrf command is required in the GRE tunnels so they use the correct routing table for routing over the internet.

So what makes this not production-worthy? The software-switching.

The ASIC can only do a set number of actions in a certain sequence without punting towards the switch CPU. Doing a layer 2 CAM table lookup or a layer 3 RIB lookup is one thing. But receiving a packet, have the RIB pointing it to a GRE tunnel, encapsulate, decapsulate and RIB lookup of another VRF is too much. It follows the expected steps in the code accordingly, the IOS software does not ‘see’ what the point is and does not take shortcuts. GRE headers are actually calculated for each packet traversing the ‘internal tunnel’ link. I’ve done a stress test and the CPU would max out at 100% at… 700 kBps, about 5,6 Mbps. So while this is a very interesting configuration and it gives an ideal situation to learn more, it’s just lab stuff.

So that’s the lesson, as stated in the beginning: how not to do it. Can you route between VRFs internally on a Cisco switch or router (not including ASR series)? Yes. Would you want to do it? No!

I’ve written about VXLAN before: it’s a proposed technology to tunnel frames over an existing IP network, allowing for much more than the 4096 VLAN limit. When writing that article, an RFC draft was proposed, which expires this month.

Coincidentally or not, Cisco has just released some new switching products, among which a new version of the Nexus 1000V, which claims to support VXLAN. Given the recent release of IBM’s 5000V virtual switch for VMware products, we’re seeing a lot of innovation done in this market segment lately, and it will surely not be the last. As I have yet to test a NX1000V, I’m unsure what VXLAN support means in real life, how it will impact network topologies, and what issues may arise. Two things stand out very clear to me: VXLAN (or any other tunneling over IP) introduces an extra layer of complexity in the network, but at the same time, it allows you to be more flexible with existing layer 2 and layer 3 boundaries as VXLAN does not require any virtual machines to be in the same (physical) VLAN for broadcast-related things, like vMotion for example.

I do have doubts that at this point in time there is a lot of interest towards these products. vSphere and competitors are delivered with a vSwitch present, so it’s less likely to be invested in: ‘There already is a switch, why place a new one?’. But the market is maturing and eventually, vSwitch functionality will become important for any data center.

Also, last but not least, special thanks to Ivan Pepelnjak and Scott Lowe. They both have excellent blogs with plenty of data center related topics, and I often read new technologies first on their blogs before anything else.

OpenBSD part VI: CARP.

Let’s start with a note to self: when copying virtual machines, be sure to generate the MAC addresses again, otherwise you may end up with two virtual machines sharing the same MAC address. That explains why CARP wouldn’t run at the first try.

But what is CARP? It stands for Common Address Redundancy Protocol, and works the same as HRSP, VRRP and GLBP: it allows several routers to share a virtual IP which acts as the gateway for connected hosts. When one of the routers fails, another takes over the virtual IP so network connectivity for the hosts remains.

CARP has quite a history, which you can read in detail on Wikipedia. Because of it, CARP uses the same IP protocol as VRRP (112) and thus will show up as VRRP in Wireshark.

Configuration, with persistence between reboots, is similar to the interface configuration and bridging setup: CARP uses a special interface which, you guessed it, is created at boot if the file /etc/hostname.carp0 is found. However, I was unable to find the correct syntax in the file for OpenBSD 5.0, and the ones suggested in the manuals don’t work. However, just having the file already creates the interface, and everything with an exclamation mark in front of it inside a hostname file will be executed as a command, so the following line works:

  • !ifconfig carp0 vhid number ip-address netmask subnetmask
  • The vhid number is the CARP group. You can have more than one CARP group per interface, but for a given group, the configuration has to be the same on all devices.
  • ip-address is the virtual IP that can be used as gateway for the hosts on the subnet.
  • Optionally, you can add ‘pass password‘ in the command to secure the CARP packets with a password.
  • Also optional, ‘advskew number‘ is a value between 0 and 254. The OpenBSD CARP with the lowest advskew value becomes the master.

Other options are possible, but these are the most important to get everything going. If things don’t work yet, it’s likely that pf is blocking the CARP packets. ‘pass in quick on em0 proto carp’ and ‘pass out quick on em0 proto carp’ solve this. Keep in mind all filtering still has to be done on the physical interface, filtering anything on ‘carp0’ will not take effect.

Finally, just like with the other gateway redundancy protocols, there’s a preempt option. When preempt is disabled, the first active OpenBSD will become master, even if other OpenBSD’s with a lower advskew value become active. When it’s enabled, the OpenBSD with the lowest advskew value will become master, whether the currently active OpenBSD has failed or not. The value can be manipulated in /etc/sysctl.conf, where net.inet.carp.preempt has to be set to ‘1’ (or just remove the ‘#’ if it’s already present but commented out).

Since I’ve covered enough for a complete setup, my next post will not be about OpenBSD anymore. Stay tuned!

Best-practices for configuring GNS3.

I’ve answered some frequently asked questions in my last blog post already, but of course there are other questions that keep returning. Many of them are related to GNS3, a graphical network emulator using Cisco IOS images. I’m going to explain how to best set up GNS3 in a Windows environment, as that is what most people do. Linux should give better results, but I’m still researching that.

GNS3 does not provide IOS images. There’s also no legal way to use IOS images in GNS3, apart from perhaps making a service contract with Cisco. So you’ll have to find the best way to use them yourself. Try to get a 37xx or 36xx IOS, because these seem to be the most stable in GNS3. Most people start with 26xx IOSes because they are most familiar with these, but they’re actually the least stable ones, so try to avoid them. Of course, the more advanced the IOS the more you’ll be able to do with it. After installing GNS3, go to ‘Edit’, then ‘IOS images and hypervisors’. There you can import the IOSes you have. Also, try to give them the memory they need, but not more, it will not be used (especially not in a lab environment) and will take more resources from your host computer.

Next, go to the tap ‘External hypervisors’ in the ‘IOS images and hypervisors’ screen. Here, leave the ‘host’ field on 127.0.0.1, choose a port, UDP and console. The default settings should be okay: +5000 for port, +10000 for UDP, +2000 for console. Also, choose a working directory, which is a personal preference. Click ‘save’ just as many times as you have threads on your CPU(s): this will allow some multithreading for GNS3, which will improve performance on a multicore system. So if you have a dual core CPU with hyperthreading for a total of four threads, make sure four instances are created.

Next, in ‘Preferences’, under ‘Dynamips’, check the ‘Enable ghost IOS feature’, as this will reduce resources needed. GNS3 will now run multiple copies of the same IOS image. Note that in a rare case, in some topologies, I have noticed instabilities here, especially when using different memory on routers using the same IOS image (which is not needed anyway).
Beneath this there’s ‘Enable sparse memory feature’. Enabling it will cause GNS3 to use a paging file more aggressively, slowing down performance. If you have enough RAM, disable it.
Additionally, take your time to look through the other options as well: you can link to Wireshark, allowing you to capture on any interface, specify a capture directory, and do the same for console software.

Now one of the most important things: start up one router with an image you will be using, and after it booted, right-clock on it, and choose ‘Calculate Idle-PC’. Then choose a value from the list, preferably one with * in front of it. This will make the emulator not calculate idle cycles of the emulated image, greatly reducing CPU stress.

And finally: never start all routers at once with the big ‘Play’ button on top. Start them one by one, and open a console after starting each one and check if you can get the basic prompt, ‘R1>_’. This takes a bit longer, but you can boot significantly more routers before everything becomes unstable.

So this way, if done properly, you can get bigger topologies running. This is a basic configuration post, in the future, I hope to explain how to get more stuff running in GNS3, and how to distribute it between different computers.

Server reconfiguration.

With CCNP SWITCH passed now I can focus on networking in general again now, instead of pure layer 2 stuff. I decided this would be a good moment to reconfigure my server.

When I was gathering materials for my home lab, I had to chance to pick up an IBM xSeries 335 server very cheap. Since it comes with two gigabit NICs and I had never worked with a rack server before, I decided to go for it. I originally installed ESX 3.5, allowing me to research virtual switching and basics of iSCSI, as well as run Windows Server and Red Hat on top of it.

Since I’m familiar with these topics now and not need them directly for my further studies, I decided to install a Linux on it now, and run Dynagen to emulate Cisco routers. Hard decision for me, as I have to admit that I’ve tried a lot with Linux in the past but never could find myself comfortable with it. I downloaded Ubuntu since this would be a relatively user-friendly choice.

Strangely enough for me, things worked out quite well so far: I installed Ubuntu, configured some network settings, installed OpenSSH server and Dynagen, and after about an hour I could log in remotely using SSH and get into Dynagen. I couldn’t do anything in it yet as I need IOS images on the Ubuntu, which I will transfer in the next days, and I’m going to have to read through the Dynagen tutorial, as well as figuring out how to easily create and edit the .net files it uses.

But all in all again a small step towards more labbing options.

Virtual switching plays an important role in the data center, so I’m going to give a brief overview of the different products. What is virtual switching? Well, a physical server these days usually has a hypervisor as operating system, which has only one function: virtualizing other operating systems to virtual machines that are running on top of the hypervisor. These virtual machines can be Windows, Linux, Solaris, or even other operating systems. These virtual machines need network connectivity. For that, they share one or more physical network interface cards on the server, commonly called a pNIC. To regulate this network traffic, a virtual switch, called a vSwitch, runs in software on the hypervisor and connects these pNICs with the virtual network interface cards of the virtual machines, called vNICs. So it looks like this:

Virtual Network

The blue parts are done in software, only the last part, the pNIC, is physical.

There are three big players in the hypervisor market: Citrix with XenServer, Microsoft with Hyper-V and VMware with ESXi or vSphere. Each has their own implementation of a virtual switch.
Apart from that, Cisco has a Nexus 1000 virtual switch.

Citrix Xenserver
I have no experience with XenServer and so far I’ve found litte information on it. A virtual switch that can be used is Open vSwitch, an open source product which runs on Xen and Virtualbox. I’m not sure if this is the only virtual switch that XenServer supports. Open vSwitch supports a variety of features you would expect from a switch: trunking, 802.1q VLAN tags, link aggregation (LACP), tunneling protocols, SwitchPort ANalyser (SPAN), IPv6, basic QoS. I could not find anything in regard to Spanning Tree Protocol support, so I’m uncertain what will happen if a loop is created to a server with multiple pNICs and no link aggregation configured.

Microsoft’s Hyper-V
Again, I have little real world experience with Hyper-V, and details are not clear, but the virtual switch supports the mandatory 802.1q VLAN tags and trunking. Advanced spanning-tree support is missing as far as I can tell, you can’t manipulate it. I’ve found no information on link aggregation support. It’s a very simple switch compared to the other products. There’s one advantage though: you can run the Routing and Remote Access role on the Windows Server and do layer 3 routing for the VMs, which offers some possibilities for NAT and separate subnets without the need of a separate router. It’s a shame Microsoft decided to no longer support OSPF on their Windows Server 2008, as this might have been a great addition to it, making a vRouter possible. RIPv2 should still work.

VMware’s ESXi and vSphere
The vSwitch developed by VMware is, in my opinion, very good for basic deployment. It supports 802.1q VLAN tags and trunking. It does not support spanning-tree but incoming spanning-tree frames are discarded instead of forwarded. Any frames entering through the pNICs that have the source MAC of one of the virtual machines are dropped. Broadcasts are sent out through only one pNIC. These mechanisms prevent loops from forming in the network. Link aggregation is present but only a static EtherChannel can be formed, which requires some additional planning. QoS is not supported, and no layer 3 functions either.

Nexus 1000 virtual switch
I’m adding the NX1000V to this list, as it is currently one of the few products on the market that can be used as a vSwitch instead of the default hypervisor vSwitch. Currently there’s only support for vSphere, but Cisco announced that there will be support for the Windows Server 8, too.
The NX1000V is supposed to support anything that’s possible with a physical Nexus switch. So compared to the default vSwitch used, it will add support for LACP, QoS, Private VLANs, access control lists, SNMP, SPAN, and so on.

With the ongoing virtualisation of data centers, virtual switching is an emerging market. For those of you interested in it, it’s worth looking into.

VLAN limit and the VXLAN proposal.

Today I stumbled across a nice RFC draft which proposes a new kind of network topology in data centers (thanks to Omar Sultan for the link on his blog). It’s four days old (at the time of writing) and is proposed by some mayor players in the data center market: it mentions Cisco, Red Hat, Citrix and VMware among others.

It proposes the use of VXLANs, or Virtual eXtensible Local Area Networks, which is basically a tunneling method to transport frames over an existing Layer 3 network. Personally, after reading through it, the first thing that came to mind was that this was another way to solve the large layer 2 domain problem that exists in data centers, in direct competition with TRILL, Cisco’s FabricPath, Juniper’s QFabric, and some other (mostly immature) protocols.

But then I realised it is so much more than that. It comes with 24 identifier bits instead of the 12 bits used with VLANs: an upgrade from 4,096 VLANs to 16.7 million VXLANs. Aside from this it also solves another problem: switch CAM tables would no longer need to keep track of all virtual MAC addresses used by VMs, but only the endpoints, which at first sight seem to be the physical servers only (I don’t think this is a big problem already. The draft claims ‘hundreds of VMs on a physical server’, which I find hard to believe, but with the increase of RAM and cores on servers this may become reality soon in every average data center). It also seems to have efficient mechanisms proposed for Layer 2 to Layer 3 address mapping and multicast traffic. Since it creates a Layer 2 tunnel, it would allow for different Layer 3 protocols as well.

Yet I still see some unsolved problems. What about QoS? Different VMs may need different QoS classifications. I also noticed the use of UDP, which I understand because this does not have the overhead of TCP, but I don’t feel comfortable sending important data on a best-effort basis. There is also no explanation what impact it will have on link MTU, though this is only a minor issue.

In any way, it’s an interesting draft, and time will tell…