Tag Archive: Intrusion Detection


Yes, I’m riding the ‘OMG-NSA!’ wave, but it’s proven to be interesting. Eventually one starts pondering about it and even trying some stuff in a lab. Hereby the results: I’ve managed to introduce a backdoor in a Cisco router so I can log in remotely using my own username and non-standard port. Granted, it’s far from perfect: it’s detectable and will be negated if you use RADIUS/TACACS+. But if you’re not paying attention it can go unnoticed for a long time. And a mayor issue for real life implementation: it requires privileged EXEC access to do it in the first place (which is why I’m publishing this: if someone untrusted has privileged EXEC access, you have bigger problems on your hands).

The compromised system
Backdoor-IOS

The router which I tested is a Cisco 2800 series, IOS 15.1(2)GC. Nothing special here. The router is managed by SSH, a local user database and uses an ACL for the management plane.

Backdoor-VTY

The goal

Accidentally getting the password and gaining access is not a backdoor. I want to log in using my own private username and password, use a non-standard port for SSH access, and bypass the ACL for the management plane.

The Setup part 1 – Backdoor configuration

How it’s done: two steps. First, just plainly configure the needed commands.

Backdoor-Config

  • The username is configured.
  • The non-standard high port is configured using a rotary group.
  • The rotary group is added to the VTY (SSH) lines. Just 0 to 4 will do.
  • The ACL for the management plane has an extra entry listing a single source address from which we will connect.

The setup part 2 – Hiding the backdoor

So far it’s still not special. Anyone checking the configuration can find this. But it can be altered using Embedded Event Manager.

Backdoor-EEM

These three EEM applets will filter out the commands and show a clean configuration instead!

  • The “backDOORrun” is the main applet which replaces the standard “show run” by one that doesn’t list the rotary group, the extra ACL entry, the username and the EEM applets themselves. Note that it’s handy to name all objects part of the backdoor in a similar way, e.g. “backDOOR”, so they are matched with a single string.
  • Since the above only affects “show run” two more applets are required for “show access-lists” and “show ip access-lists”. Note that these are only needed if a non-standard port is used, to mask the ACL.

Detectability

Several things do give away that there might be a back door. First of all, port 4362 will respond (SYN,ACK) to a port scan, revealing that something is listening. Second, although the commands are replaced, there’s a distinct ‘extra’ CLI prompt after the commands:

Backdoor-Detection

This only shows if you don’t do any pipe commands yourself and easily mistaken for an accidental extra hit on the ‘enter’ key, but when you’re aware of it, it does stand out.

And last, once you take the running config from the device (through TFTP for example) and open it in a text editor, everything will show as normal. And by knowing the EEM applet names, you can remove them.

I have to admit, this article will sound a bit like an advertisement. But given that Cisco has gotten enough attention on this blog already, it can only bring variation into the mix.

A short explanation of a series of different products offered by F5 Networks. Why? If you’re a returning reader to this blog and work in the network industry, chances are you’ll either have encountered one of these appliances already, or could use them (or another vendor’s equivalent of course).

F5-LTM

LTM
The Local Traffic Manager’s main function is load balancing. This means it can divide incoming connections over multiple servers.
Why you would want this:
A typical web server will scale up to a few hundred or thousand connections, depending on the hardware and services it is running and presenting. But there may be more connections needed than one server can handle. Load balancing allows for scalability.
Some extra goodies that come with it:

  • Load balancing method: of course you can choose how to divide the connections. Simply round-robin, weighted in favor of a better server that can handle more, always to the server with the least connections,…
  • SSL Offloading: the LTM can provide the encryption for HTTPS websites and forward the connections in plain HTTP to the web servers, so they don’t have to consume CPU time for encryption.
  • OneConnect: instead of simply forwarding each connection to the servers in the load balancing pool, the LTM can set up a TCP connection with each server and reuse it for every incoming connection, e.g. a new HTTP GET for each external connection over the same inbound connection. Just like SSL Offloading, it consumes fewer resources on the servers. (Not every website handles this well.)
  • Port translation: not really NAT but you can configure the LTM for listening on port 80 HTTP or 443 HTTPS while the servers have their webpage running on different ports.
  • Health checks: if one of the servers in the pool fails, the LTM can detect this and stop sending connections to the server. The service or website will stay up, it will just be able to accept fewer resources. You can even upgrade servers one by one without downtime for the website (but make sure to plan this properly).
  • IPv6 to IPv4 translation: your web servers and entire network does not have to be IPv6 capable. Just the network up to the LTM has to be.

F5-ASM

ASM
The Application Security Manager can be placed in front of servers (one server per external IP address) and functions as an IPS.
Why you would want this:
If you have a server reachable from the internet, it is vulnerable to attack. Simple as that. Even internal services can be attacked.
Some extra goodies that come with it:

  • SSL Offloading: the ASM can provide the encryption for HTTPS websites just like the LTM. The benefit here is that you can check for attack vectors inside the encrypted session.
  • Automated requests recognition: scanning tools can be recognized and prevented access to the website or service.
  • Geolocation blocks: it’s possible to block out entire countries with automatic lists of IP ranges. This way you can offer the service only where you want it, or stop certain untrusted regions from connecting.

GTM
The Global Traffic Manager is a DNS forwarding service that can handle many requests at the same time with some custom features.
Why you would want this:
This one isn’t useful if the service you’re offering isn’t spread out over multiple data centers in geographically different regions. If it is, it will help redirect traffic to the nearest data center and provide some DDoS resistance too.
Some extra goodies that come with it:

  • DNSSec: secured DNS support which prevents spoofing.
  • Location-based DNS: by matching the DNS request with a list of geographical IP allocations, the DNS reply will contain an A record (or AAAA record) that points to the nearest data center.
  • Caching: the GTM also caches DNS requests to respond faster.
  • DDoS proof: automated DNS floods are detected and prevented.

F5-APM

APM
The Access Policy Manager is a device that provides SSLVPN services.
Why you would want this:
The APM will connect remote devices with encryption to the corporate network with a lot of security options.
Some extra goodies that come with it:

  • SSLVPN: no technical knowledge required for the remote user and works over SSL (TCP 443) so there’s a low chance of firewalls blocking it.
  • SSO: Single Sign On support. Log on to the VPN and credentials for other services (e.g. Remote Desktop) are automatically supplied.
  • AAA: lots of different authentication options, local, Radius, third-party,…
  • Application publishing: instead of opening a tunnel, the APM can publish applications after the login page (e.g. Remote Desktop, Citrix) that open directly.

So what benefit would you have from knowing this? More than you think: many times when a network or service is designed, no attention is given to these components. Yet they can help scale out a service without resorting to complex solutions.

If you ever managed a Campus LAN, you’ll know what happens with a lot of end users that have access to ethernet cables on desks. The occasional rogue hub, a loop now and then, and if they have access to some more advanced tools, some BPDU’s and a rogue DHCP server. Most of these events are not intended to be malicious (even the BPDU’s and rogue DHCP), but they happen because end users are not aware of the impact of some devices on the network.

But, given a malicious intend, what are the possibilities of attacking a switched Cisco network from a directly attached interface? Operating system for all the upcoming attacks: BackTrack Linux, which has many interesting tools installed.

MAC Flood
The classic attack first: flooding the switch’s CAM table with random source MAC addresses.
Tool: macof
Countermeasure: port-security

First attacking without port security: as expected, CAM table fills, CPU increases and everything is flooded. Congestion everywhere.

L2Attack-1

Finding this attack without port-security is feasible by checking CPU processes: HLFM address learning doesn’t normally consume that much CPU. Turning of MAC address learning does the same but without CPU impact.

So does turning port-security on solve the problem? It depends. Turning it on and setting it to only block new mac addresses but not shutting down the port actually makes things worse for the CPU:

L2Attack-2

The best solution: port-security with shutdown of the port in case of too many MAC addresses. No flooding, no CPU hogging.

CDP Flood
A Cisco-only attack. Flooding CDP frames with fake neighbors, causing not only CPU spikes, but also clogging the memory with all the neighbor entries. ‘show cdp neighbor’ becomes like showing the route table on a BGP router: endless.
Tool: Yersinia
Countermeasure: disabling CDP on the port or globally.

The attack with CDP turned on (the default) is very effective:

L2Attack-3

Finding the attack is easy, as both CPU and memory will clearly show the CDP process is using up resources. However, without CDP on the port, the attack does nothing. So the best solution: always turn CDP off towards a user-facing port. Even behind an IP Phone, although some functionality will be lost.

Root BPDU inject
A funny one. Inject a BPDU claiming to be root to cause spanning-tree recalculations and creating suboptimal paths in the network.
Tool: Yersinia
Countermeasure: Root Guard.

L2Attack-4

Notice the root ID, which has a nearly identical MAC address to make it difficult to spot the difference, and the aging time of two days, making this an attack that will last while the attacker is no longer connected. Root Guard on the port counters this attack easily though.

BPDU Flood
This attack doesn’t try to change the spanning-tree topology, but rather overload the STP process. Consequence is high CPU and eventually spanning tree inconsistencies.
Tool: Yersinia
Countermeasure: BPDU Guard

L2Attack-5

Spanning-tree should not use that much CPU on a switch. HLFM address learning will increase too due to the random source MAC addresses, and depending on the switch, Hulc LED Process will increase too. This is the process that governs the LED status of all switchports: the more ports the switch, the more this process will consume CPU if flooding attacks are happening.

BPDU Guard stops this effectively by shutting down the port. BPDU Filter not so much: it still needs to look at the BPDU to drop it and not forward it in hardware. BPDU Filter is generally not recommended anyway.

DHCP Discover Flood
Not really a layer 2 attack, but still impacting for the local subnet. Sending a flood of DHCP Discover messages, quickly overloading the DHCP Server(s) for the subnet.
Tool: Yersinia
Countermeasure: DHCP Snooping and DHCP Snooping Rate Limit

If DHCP Snooping isn’t enabled on the switch, it behaves like a MAC Flood attack and can be countered accordingly. Simply enabling DHCP Snooping, which is against rogue servers and not against flooding, makes things worse.

L2Attack-6Not only does it make the CPU spike, but it’s one of the few attacks that makes the switch unresponsive in the data plane, meaning not only management is lost, but the switch stops forwarding most frames, with packet loss on all ports. Simple snooping does prevent execution from a virtual machine:

L2Attack-7

But to really protect against this attack, DHCP Snooping rate-limiting helps:

L2Attack-8

OSPF Flood
Sending a flood of OSPF Hello packets over a switch.
Tool: a virtual machine running ospfd (Vyatta, OpenBSD), and a hub between switch and computer with cable loop to cause the flood.
Countermeasure: ACL

For this one I didn’t use any specific tool. I just made my computer send out an OSPF Hello, and made sure the hub between computer and switch was wired so it would flood the frame. Result: spectacular. The switch CPU rises to 100% and management connections, including console, are dropped. Reason is that the OSPF process has higher priority. But now the shocking part: this was done on a layer 3 Cisco switch without OSPF configured, and without an IP address in the attacker VLAN.

Explanation: Cisco switches use something called pak_priority. It means that certain packets on ingress are labeled by the interface driver as priority and to be checked by CPU (Source). This is done to make sure network control packets get to the CPU in case of congestion. It’s the case for RIP, OSPF and EIGRP, but not for BGP packets.

I retried it with EIGRP (although this required a second Cisco device to generate the EIGRP hello) and the result is the same: no EIGRP configuration on the switch, still impact. The data plane does not have any impact: forwarding stays as usual mostly.

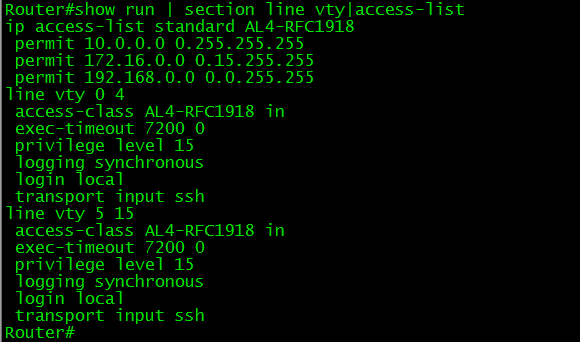
Solution? Strange enough, an ACL on each port blocking EIGRP (IP Protocol 88) and OSPF (IP Protocol 89) and allowing everything else seems to work. The ACL is checked in hardware as long as the ‘log’ parameter isn’t present. So for better security, it seems you’re stuck with an ACL on each switchport of a layer 3 switch.

Conclusion
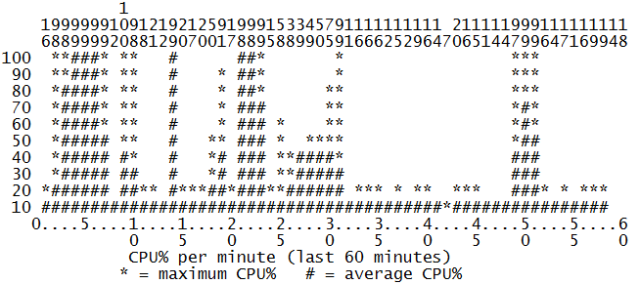
I’m sure most of the readers now conclude that there’s still a security leak somewhere in their network. Just for reference, I’ll include the CPU graph of an hour of testing all these attacks.

L2Attack-9

A simple honey pot test.

Security today. I’ve done some testing with a honey pot. What is a honey pot? It’s a (network) construction you make to lure in hack attempts and/or malware. You can use it for early detection of threats, analysing attacker behaviour, or drawing away attention from the real target.

There are several ways to set up a honey pot, depending on what you want. Inside an enterprise, you can set up a server that acts just like a real production device, but it’s not providing any real services and instead is logging every attack against it. Allocating an empty subnet, then logging everything that enters that subnet is also a good method: an empty subnet is supposed to be untouched, so anything entering it may be scanning for targets.

My method is similar to the ones above, except I don’t have a free subnet to allocate. But the NAT router I have has a DMZ option. In practice this does the following: any port or protocol that’s not in use by another device on the private subnet, will be forwarded to the IP defined in DMZ. Example: PC 2 is set in DMZ, internal IP 192.168.168.2. All other PCs use the NAT router to access internet. This means that if PC 2 makes a connection to a web server, source port 33502, destination port 80, the web server will reply from port 80 to port 33502 again. The NAT router then forwards port 33502 to PC 2 because it was opened by PC 2. But if something enters on port 33503 and that port has not been opened by an inside device, it will be forwarded to PC 1, who will then log it.

Honeypot

For logging I used a Windows XP with Wireshark. The Windows XP had static IP 192.168.168.2, correct subnetmask, but no gateway. Why? Because I want to do passive logging and the logging device should be unable to respond back, especially since it had no firewall and received everything unfiltered. On Wireshark I set up a filter to only capture unicast packets to its own static IP, filtering away background noise. The only problem is that my ISP blocks off any incoming port below 1024, meaning I will not see any connection attempts on most well-known ports, so I had no big expectations.

I kept it running all night, a total of 14 hours and 30 minutes. And the next day, Wireshark indeed reported several captured packets. Here’s what I found:

  • 50 hits for incoming destination UDP port 12148. Mostly IPs from Europe, some from North and South America, random source ports. I have no idea what this means, as port 12148 doesn’t have any registered service to it.
  • 65 hits for TCP SYN on destination port 12148. Again randomly throughout the night, random IPs and source ports. No recognizable pattern, and no relation to the UDP packets. Still, no idea.
  • 15 hits for destination UDP port 1030. Not officially registered, but it seems to be used as a loopback port for exchanging information between software components in Windows. All from the same IP – somewhere in Poland – but random throughout the night, sometimes with hours between. Not sure if this is indeed an attempt of some sort, or just a confused device somewhere in Poland.
  • 4 hits with source UDP port 53, DNS, to a random destination port. Three IPs, all from (anycast) DNS servers I don’t use. Message content is ‘format error’ or ‘server failure’. Probably not an attempt for something but consequence of some malconfigured device somewhere, I think.
  • 3 ping requests. Because of the missing gateway on my honey pot, no reply. All three occurred from different locations around the world and consisted of two pings with exactly 2.2 seconds between them. Strong indication the same tool is being used here, and likely an attempt to check if anything is alive on my IP.
  • 1 hit for UDP destination port 1434 – SQL. From China. That’s an attempt alright.

That’s 4 packets over 14 hours which are used to scan for weaknesses: 3 ping, 1 SQL. Not taking into account anything below 1024. Not much, but enough to prove the necessity for firewalling.

Extra information: to look up the geographical location of each IP, I used http://www.ipligence.com/geolocation

Layer 2 security methods.

Another week has passed and I’ve used it to concentrate on layer 2 security: DHCP Snooping, Dynamic ARP Inspection and IP Source Guard. I had trouble getting the latter two to work until I realised they work together with DHCP Snooping, and static entries you have to define. But it works now, another thing learned, another check box for the Cisco SWITCH exam.

Time to list some common layer 2 security methods. I will briefly discuss each one here. Note that I use example values, and where I use a VLAN, you can also use a VLAN list most of the time. The interface range command works for these commands as well, allowing for faster configuration.

Port security
The easiest one I think: binds a MAC address to a switchport, so only that host can connect to only that switchport. By default, only one MAC address is allowed, but you can set it to more. Recommended in case of IP Phones, or a hypervisor with multiple virtual machines. Commands:

Switch(config-if)#switchport port-security
Switch(config-if)#switchport port-security mac-address sticky
Switch(config-if)#switchport port-security violation restrict

The second command uses the ‘sticky’ keyword. This means the first MAC address to be detected will be used and added to the running-config. Saves you the time of typing a lot of MAC addresses. The violation mode is restrict here, which drops frames from other MAC addresses and logs an SNMP trap. ‘protected’ would do the same without SNMP trap, and ‘shutdown’ would shutdown the port so nothing can be received on it anymore.

DHCP Snooping
Prevents a rogue DHCP server from handing out IP addresses in the network. The point is not that IP addresses are handed out, but the DHCP server determines the default router, allowing it to influence routes. Personally, I don’t think it’s an often used attack, but it also builds a DHCP binding table on the switch that can be used to prevent other attacks. Configuration:

Switch(config)#ip dhcp snooping
Switch(config)#ip dhcp snooping vlan 1

This activates it for VLAN 1. Of course, the link going to the right DHCP server should be trusted:

Switch(config-if)#ip dhcp snooping trust

IP Source Guard
This function makes sure that a frame sent by a host really came from that host. It does so by comparing the source IP with the source switchport. For the source IP, it either needs the DHCP snooping database (which you can see with the ‘show ip dhcp snooping’), or statically defined entries. An example of a statically defined entry:

Switch(config)#ip source binding 0010.72ab.07f5 vlan 1 192.168.0.5 interface FastEthernet0/3

To enable it, the command must be done on the interface(s):

Switch(config-if)#ip verify source

You can also add the keyword ‘port-security’ after this to check the right MAC address too, but port-security has to be enabled.

Dynamic ARP Inspection
DAI makes sure no false ARP replies or gratuitous ARPs (GARP) are sent. Like IP Source Guard, it uses either the DHCP snooping database or static entries. The static entries are defined with an arp access-list:

Switch(config)#arp access-list ExampleARPlist
Switch(config-acl)#permit ip host 192.168.0.5 mac host 0010.72ab.07f5

To apply it on a VLAN:

Switch(config)#ip arp inspection vlan 1
Switch(config)#ip arp inspection filter ExampleARPlist vlan 1

Private VLANs
I’m mentioning them here because it adds to the security. Very useful in environments where you want hosts to communicate with the gateway, but not each other. For a configuration example, see one of my first blog posts.

802.1x
This makes sure only hosts with the right credentials can connect. A client device must have support for this, but every modern operating system has this. A client device provides a username and password (usually to be filled in somewhere in the network interface options). This password is then checked against a database, usually by RADIUS. If the right credentials are provided, the client device gains access to the network. Activating it requires several commands, as authentication has to be set up. I’m not going to explain how to set up the RADIUS server here.

Switch(config)#aaa new-model
Switch(config)#radius-server host 192.168.1.1
Switch(config)#aaa authentication dot1x default group radius
Switch(config)#dot1x system-auth-control

Switch(config-if)#dot1x port-control auto

Disable Dynamic Trunking Protocol
To prevent a device from forming a trunk link with a switch, and thus gain access to all VLANs, always disable DTP on end-node links:

Switch(config-if)#switchport nonegotiate

BPDU Guard
To prevent any of the end-nodes from taking over as a spanning-tree root bridge, it’s best to configure BPDU Guard. Since these switchports can also be configured with portfast for faster convergence, you can enable BPDU Guard by default too:

Switch(config)#spanning-tree portfast bpduguard default

Switch(config-if)#spanning-tree bpduguard enable

Alternatively, you can configure ‘bpdufilter’ instead of ‘bpduguard’. The difference is that with the first command BPDUs will be filtered, whereas the second command will disable the port.

Preventing double tagging
And finally, this method has no real commands but is just a best-practice: always try to set the native VLAN on trunks to an unused VLAN, and choose another VLAN than VLAN 1 for management. This makes it harder to find the management VLAN, and prevents VLAN hopping attacks. VLAN hopping is done when a frame is sent with two 802.1q tags, of which the first one belongs to a native VLAN. At a trunk link, the first tag will be stripped off the frame, and when received on the next switch, the second VLAN tag will be used. This way, the frame ‘hops’ between VLANs, making attacks possible that are hard to trace.